Setting up Notifications Using RabbitMQ
- Sophia
Setting up Notifications Using RabbitMQ
Installation of the RabbitMQ Broker
The first step in the installation of the message service is to download and install the latest RabbitMQ messaging service. The latest version of RabbitMQ you have tested is 3.7.5. We won't describe the installation process for RabbitMQ here but we refer you to the official documentation page here. The RabbitMQ documentation online is excellent and describes in detail the installation process for the RabbitMQ message broker on a number of different platforms.
Configuration of the RabbitMQ Broker
Once you have installed your instance of RabbitMQ broker, the next step is to configure the user account, virtual host and exchange required for OpenEMPI to integrate with the broker.
- Create an account for a user that OpenEMPI will use to interact with the broker. We assume that the username for the account is "openempi" but you can use any username.
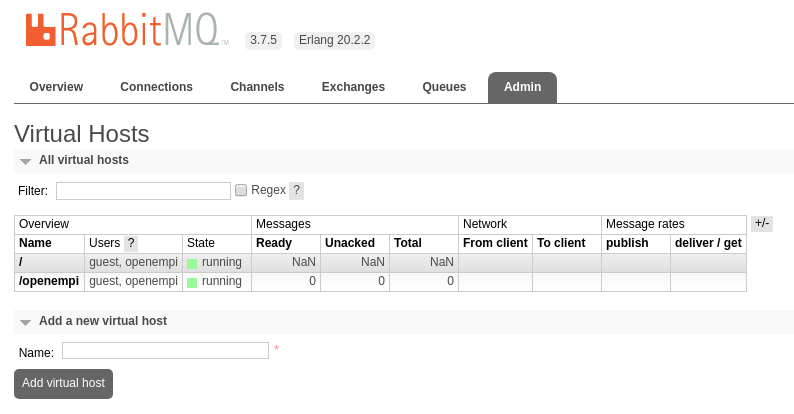
- Create a virtual host on the RabbitMQ broker for OpenEMPI to use. The virtual host provides isolation and security between different applications that make use of a single broker and OpenEMPI assumes that you have a separate vhost for its use. We assume that the virtual host for OpenEMPI is called "/openempi". Make sure that user "openempi" has access to the new virtual host "/openempi"
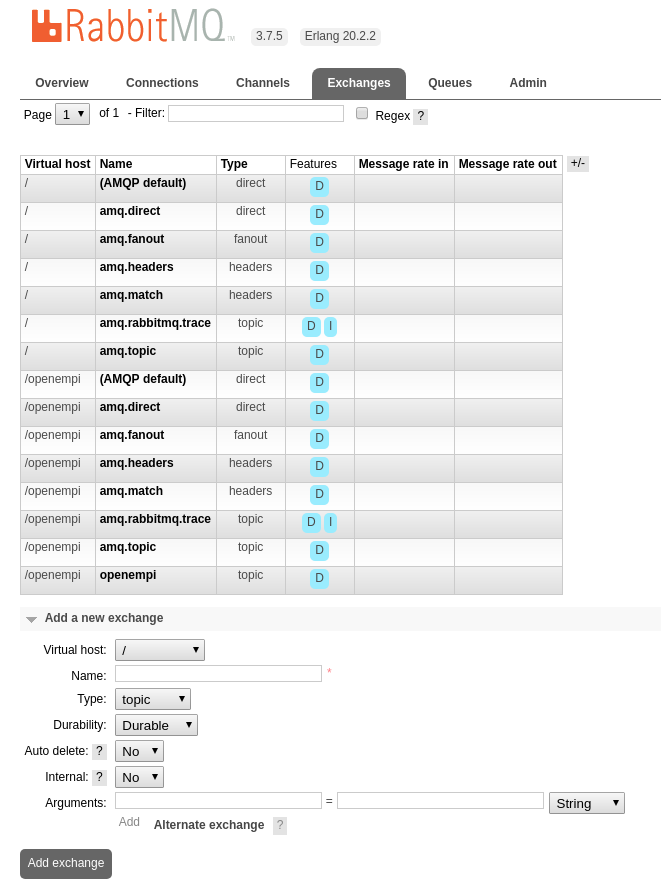
- Create an exchange of type "topic" that is durable for use by OpenEMPI and its consumers. We assume the exchange is called "openempi" and is created on the "/openempi" vhost as shown in the figure below.
- The last step in the configuration is to create the appropriate queues and bind them to the "openempi exchange. The table below shows the name of the queues that OpenEMPI uses when sending out messages and you want to connect to the appropriate queue or queues to receive the messages you are interested in.
| Queue Name | Description of messages sent to this Queue |
|---|---|
| add | Sends a message when a new record is added along with the record that was added |
| delete | Sends a message when an existing record is deleted along with the record that was deleted |
| import | Sends a message when a new record is imported along with the record that was imported |
| merge | Sends a message when two records are merged along with the records that were merged |
| update | Sends a message when an existing record is updated along with the record that was updated |
| identifierUpdate | Sends a message when a records global identifier was modified. This occurs when two or more records are linked or unlinked |
Configuration of OpenEMPI
This section describes how the configuration of OpenEMPI needs to be modified to support integration with the RabbitMQ broker. You must first stop the server before performing these changes.
- First you must activate the RabbitMQ broker adapter module by adding or uncommenting the rabbitmq-adapter module line in the openempi-extension-contexts.properties file and make sure that the default notification server module is deactivated. The openempi-extension-contexts.properties file is in the conf directory of your OpenEMPI installation. You can see what the configuration file should look like below.
...
#applicationContext-module-notifications.xml
applicationContext-module-rabbitmq-adapter.xml
- Next you must plugin the appropriate notification service implementation in your OpenEMPI instance. This consists of disabling the default notification service implementation. To do this you need to modify the applicationContext-service.xml file which is also in the conf directory of your OpenEMPI installation. You need to find the line that points to the default implementation of the service and disable it by renaming it from "notificationService" to "defaultNotificationService".
Before the change the line should look like the following line:
...
<bean id="notificationService" class="org.openhie.openempi.notification.impl.DefaultNotificationService">
...
...
<bean id="defaultNotificationService" class="org.openhie.openempi.notification.impl.DefaultNotificationService">
...
- The last step is to configure OpenEMPI to connect to the instance of the RabbitMQ broker you installed and configured previously. You must edit or create the rabbitmq.properties file in the conf directory. The file must include the following parameters that identify the all the connection parameters you need to connect OpenEMPI with your RabbitMQ broker. You must change the parameters as needed for your particular configuration of RabbitMQ.
rabbitmq-server-host=localhost
rabbitmq-exchange=openempi
rabbitmq-virtual-host=/openempi
rabbitmq-username=openempi
rabbitmq-password=openempi
rabbitmq-port=5672
After you start the OpenEMPI, any messages OpenEMPI generates during its operation will be sent to the RabbitMQ broker and then on to any consumers that are bound to the queues listed above.